Workflow Management

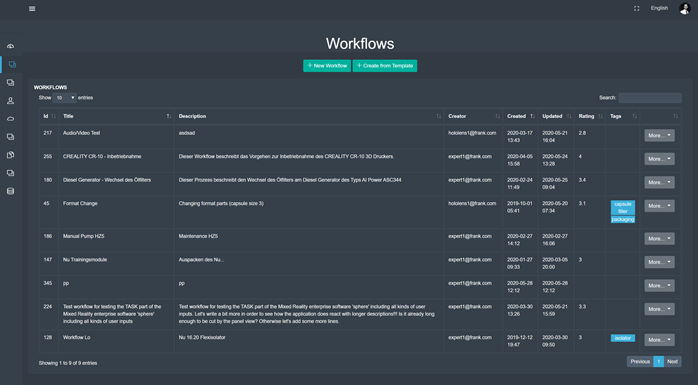
After having navigated to the ‘Workflows – Workflows’ tab, the user is presented with a screen similar to the one depicted above – a list of individual workflows as defined by the company. Actual workflows displayed may vary from company to company.
With the two green buttons on the top middle of the page, the user may create a new workflow from scratch (left button) or create a new workflow from a template (right button).
The list of workflows displayed in the centre of the page consists of (from left to right) an ID, title of the workflow, a brief description, the workflow’s creator’s email address, the date of creation, the date it was last updated, the workflow’s rating, appropriate tags and a ‘More’ button.
By clicking the ‘More’ button, the user can edit the selected workflow, edit steps within the workflow, download a QR code triggering the workflow or delete the workflow entirely.
Creating a Workflow
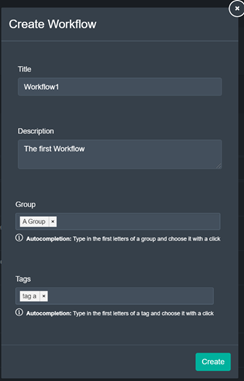
After having clicked the ‘New Workflow’ button, a pop-up window appears asking the user to specify the workflows title, description, which groups (if any) should have access as well as tags.
As soon as the user is satisfied by the settings, he may save them with the green ‘Create’ button on the bottom right of the pop-up and continue to create the workflow.


After having selected ‘Create’, the user is presented with the screen depicted above.
With the three green buttons on the top middle of the page, the user may add a new step (left button), save the changes made (middle button) or create a template from the workflow.
Details on how to add and edit steps can be found here.
Creating a Workflow Based on a Template
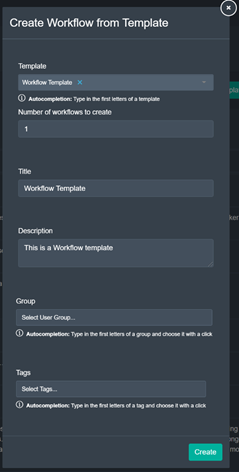
After having clicked the ‘Create From Template’ button, a pop-up window appears asking the user to specify the template he wants to base the new workflow on.
After having selected a template, the title, description, group access and tags are filled in automatically, but can be changed by the user if so desired. Further, the user can specify the number of workflows he wishes to create based on the template. After the user is satisfied with the entered information, he may click the green ‘Create’ button in the bottom right corner of the pop-up, which will redirect him to a screen with the selected workflow.

Editing a Workflow
After selecting ‘Edit Workflow’ from the dropdown of the ‘More’ button, a pop-up appears identical to the pop-up when creating a new workflow.
In the pop-up, the user can change the workflow’s title, description, group access as well as associated tags. As soon as the user is satisfied by the changes, he may save them with the green ‘Edit’ button on the bottom right of the pop-up.